Drive Customers Through Blogging for Your Business

How Blogging for Your Business can Benefit Your Business to Drive CustomersBlogging for Business is an Effective tool, It can help Businesses in many ways in a Long Run. I have had discussions with many business owners and tried to convince them about blogging for their Business to Spread the word about their Business. Fortunately few of them agreed and started this thing which is a Positive Culture in my own Point of View. Today I am going to Cover that Why a Business Should Must have a Blog? & How can a Blog help Grow a Business?
Though there are Dozens of Benefits of Blogging for Your own Business but I am going to Mention Few Benefits of Blogging for Business here in this Post, So Lets Start.

Free Traffic:

Most hard part of getting new customers is to get visitors on Your Business website. Yes, there are many other Paid ways Including PPC, Blackhat and stuff like Buying Email Lists Which is never recommended. But Having a Business Blog is the easiest and free way to get more visitors to your Blog, Website and then they become Your Customers. This Process keep working till you stop promoting Your Business and Blog in a Proper way.
Driving Customer to your Website:
The Best Benefit You can gain from Blogging in My own Point of View is that you can Drive People to Your Business’s Main Website. And if You have done Good work on Your website, it will take no time to convert those Readers to Your Potential Customers. It’s really Simple, You help people by Producing Content related to the topic of Your Business and its drives traffic to your Business Blog. They get help and it saves them lot of time and they check out your stuff further and if they are Impressed with your Business they are going to become your Potential Long-Term Customers.
Introducing Your Business to People:
Having a Business Blog can Also Help you to Introduce Your Business to people who don’t Know about your Business. This Point is somehow connected with the Point we discussed earlier in this post. When you Produce Content and help People they try to reward you in some way.
They check out Your Friends, other Blogs in Your Network and in most cases your own Business website where You can Introduce them to your Business. This is the best way to Spread the word about Your Business to the People who don’t Know about Your Business.
Staying Connected with Customers:
Another big Benefit of Blogging for your Business is that you can stay connected with your Existing and new customers. You can use your Business Blog for sharing latestthings going on in your Company or Business and this can help Your Customers stay updated about what is going on. This also helps if you are having some problem and you want to notify your Customers in an easy way, You can use your Business Blog for this Purpose.
Connect with Community:
It’s a usual thing to have Many like-minded people in one Business Model. Just like Real life, People love to connect with other Businesses and get more engagement and Customers. You can Ask few like-minded people running similar businesses to connect to you using Your Business Blogs.
They can Connect to your Blog and You can Connect to theirs using Blogroll Links or we can also call it “Friends” section for the Sake of Building a Good Business Community and making relationships with other Similar Businesses.
Getting Feedback from Customers and People:
Just like any other thing which is Important for your Business, getting Proper and regular Feedback from your Existing and New Customers is also very important to Improve your Services and Provide the best you can to your Existing customers so that they do not leave Your Product.
Having a Business blog can help You to do that easily, People can share Ideas with you in the Comments and Feedback section of your Blog posts and it’s much more effective way rather than using a contact form .

0 comments:

Thank you!

Making Money with a Blog


There are Thousands of ways to make money with a Blog, I am going to Present some of them here, I’ll explain others in my later post:

Contextual Advertising:

Contextual advertising is a way of advertising which is used to target ads to specific keywords. Going deeper, Actually these ads are picked up by an automated system after identifying the keywords on web page. Google Adsense and many others use this method of Advertising.

Direct Advertising:

You can also Sell your Blog’s space to Advertisers Directly, for doing this you should display a banner having “Advertise Here” text in it so that Advertiser should contact you and pay you to display his ad on your blog.
The Price of Advertising depends upon the Advertisement size, traffic and niche of your blog or website. Some people really earn too much using direct advertising likeProblogger.

Text Links Advertising:

There are many other networks who allow to show their advertisements in Text Links, You just have to signup to those networks and Paste the snippet code to your blog’s HTML area.
These Link Ads work in the way that they are controlled by a system which recognizes the keywords in the text and places a link in that keyword, Whenever user hovers his cursor on that keyword that advertisement pops out and when ever user clicks it Publisher or Blogger gets Money.
There are many Text Link Advertising Companies, I have tested Text Link Ads and Infolinks But this way of advertising is not so much good.
Last Words:
Hope you got Answers of Each Question in your mind about What is Blogging, In case we have not Answered and Question about which you are curious, Feel free to ask In Comments section.

0 comments:

Thank you!

What Type of Web Hosting do I Need?


This depends on what kind of website you want to create. If you are a professional or own a small office or company, you can select our Basic Web Hosting Package which includes 250 MB disk space along with all the other features that a good web hosting package should have such as high bandwidth, 99.9% uptime and 24 X 7 customer support. However, if you want to make a website where you expect to get higher traffic, say around 1000 visits per day, you can buy Advanced Web Hosting Package which offers 500 MB space with other features and additional feature of MySQL along with free Google Adwords credit of Rs. 2500 to advertise your site. If you are about to make an ecommerce site or sites, you should buy the Ecommerce Hosting Plan. It gives you 2GB space, java support and Rs 2500 free Google Adwords credit. You can also host upto 5 sites with this package. The Mega Web Hosting Plan is for medium and large enterprises. It offers 750 MB space along with all the other useful features of a best web hosting package. If, however, you do not find any of these plans suitable for making and hosting your website, you can even create your Custom Hosting Package with whatever features you want to have in your own hosting plan.

0 comments:

Thank you!

What is the Difference Between Linux and Windows Web Hosting?


Whenever you go for a web hosting plan, you have to select the operating system on which the server will run. Windows and Linux are the two most popular operating systems for web hosting. Operating systems work at the back end and it does not make much difference to the end user. However, the features and options provided by Linux and windows operating systems for web hosting should be definitely considered before selecting the one that’s best suited for your requirements. 

Windows and Linux, both offer FTP access to your files. However, only Linux Hosting generally offers telnet or ssh access through which you can open a window directly on the Web server to edit them. If your website is going to be a dynamic web site then you will need a database too. Access and MySQL are the two most popular databases. Linux servers most often offer mySQL. However mySQL runs on both Linux and Windows. Access is available only for Windows Hosting.

Security is one of the major concerns for any website. Many people consider Linux to be more secure than Windows web server but they are both equally secure. Security is more an issue at the level of hosting service's administration and not at the operating system level. Good administrators ensure that your server remains secure whatever the OS is.

Now which OS to choose for web hosting? You can select Linux or Windows web hosting based upon the features that you need for your website. Linux web hosting is more popular because it has more features for better web designing. However, many websites need specific Windows applications. If your website needs window specific applications then you have to go for windows web hosting. In case you want to experiment with both Linux and Windows hosting, you can opt for Java Hosting. When you use Java hosting, you don’t have to face portability issues. The same underlying code works on both Windows as well as Linux servers and it is suitable for everyone, from beginners to technical experts.

0 comments:

Thank you!

How to Install WordPress Themes

The first thing you need to do when you want to install a new WordPress theme is to login to your site admin page. Once there, go to Appearance -> Themes.


Here, you will see all the themes you have currently installed in your application. To add another one, simply click on the Install Themes tab.


On this page there are two ways to add a new theme. You can either use the search field which will return results from the WordPress.org theme directory or you can upload a theme from your local hard drive. In this tutorial we will show you how to add themes in both ways.

Choose and Install a theme from the official WordPress theme directory

The easiest way to install themes to your WordPress site is if they are listed in the official themes directory. This allows you to search for the theme you need directly from your site admin page. Each theme in the official directory has to have Tags that describe its functionality allowing you to easily search for the right theme.
If you know the theme's name, you can simply search for it.


However, usually that's not the case. This is why, you can use the Feature Filter. For example, you can search for a Black and WhiteTwo columns theme that has Flexible Width. Simply check those tags and press the Apply Filters button.


You will now see all themes that meet your search. Hover over any of them and you will see two options - to see a demo of the theme or to install it. Once you choose which theme you want to use for your site, press the blue Install button.


Your WordPress application will download and install the theme for you. Simply click the Acticate link on the next page you will be redirected to.


That's all - you can go to the front page of your site to see its new looks.


Upload a theme you have already downloaded

If you have a theme that's not listed in the WordPress.org directory, you can simply upload it from theThemes -> Install Themes section in WordPress. To do this click on the Upload link at the top of the page.


Now, click the Choose File button, select the archive of your theme from your local computer and press the Install Now button.


In few seconds, WordPress will upload and extract the theme archive for you. All you need to do next is to press the Activate link under the message for successful theme installation.


That's it! You can now go to the front end of your site and see the newly activated theme.

0 comments:

Thank you!

How to Use WordPress Categories

WordPress categories are a very convenient way to organize your posts. You can have parent and child categories making hierarchical arrangement of your posts possible. In addition to that, one post can be into more than one category. This gives you a lot of flexibility to show exactly the posts you want, exactly the way you want them in widgets, menus or directly in your WordPress theme.


To creat new categories in WordPress, you need to access the Posts -> Catgories page first.


On the left side of the page you will see a tab that allows you to create categories. Fill in the category name, its slug (will be used in the category URLs) and the Add New Category button. For the purpose of this tutorial we will make a new category named Family posts.


That's it, your first category is ready. Now, let's make a sub-category of the Family posts one namedNephews. Fill in a name and slug the way you did with the first category but this time select Family posts as parent for the new category. Then, press Add New Category once more to save thew new sub-category.


How to assign posts to categories

Once you have the category structure created, you can add posts to categories. There are two ways you can do this. The first one is to open a particular post (or write a new one) and place a checkbox in the category you want to assign it to.


The second way is to bulk add posts to a category. To do this go to Posts -> All Posts. Next, select the posts you want to add to a category, click on the Bulk Actions tab, select Edit and finally press theApply button.


Once you do that, you will few options you can adjust for those posts. One of them is the Categoriessection. Select the category you want to add those posts to and click on the Update button.


Now, the posts you've marked previously belong to the category you've chosen.


0 comments:

Thank you!

How to Install WordPress Plugins?


Plugins are tools which provide additional functionality to your application. To install a plugin you generally just need to put the plugin file into your 'wp-content/plugins' directory. Once a plugin is installed, you may activate it or deactivate it from the Plugins menu in your WP administration.


Generally the Plugin installation is a straight-forward process. In most cases it is enough to upload the plugin under the 'wp-content/plugins' directory for the WordPress installation and activate it from the administrator backend.


In WordPress 2.7 and above you can install plugins directly from the admin area. Download the plugin to your computer, then log in to your WP admin area and go to Plugins > Add New. Browse to the plugin archive and select it. Then click Install Now and the plugin will be installed shortly.


The removal is also straight-forward in most cases. Simply remove the directory for the plugin you would like to uninstall and it will be automatically deactivated.
Still always bear in mind that not all plugins are easy to install, so always refer to their documentation and installation instructions first.

0 comments:

Thank you!

How to add Multiple Domain in Single Hosting

Muliple Domain

With domain names becoming a generic commodity more and more people actually own a domain name. However, more often these people not only own one domain name, they have several domain names registered under their name. What is missing is often the knowledge on how to host the matching websites without paying a fortune. This Wiki will explain how host several websites from a single web hosting account.


1
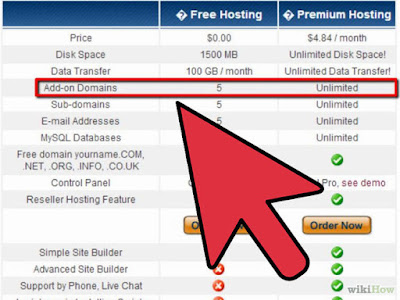
To host several websites from a single web hosting account you will need to pick a web hosting package that includes so-called addon domains or domain aliases as a feature.


2
Pick the top level domain the web hosting account shall be running under.This will be your main domain name you want to work with.


3
Sign up for a web hosting package that includes addon domains.


4
Once you have signed up you will receive login information as well as you will receive so-called DNS server information from your web host. Go to the domain registry where you registered the different domain names and change the DNS server settings to the DNS servers provided by your web host.


5
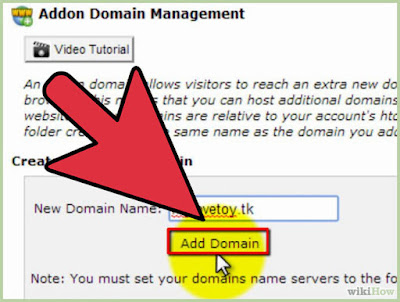
In your web hosting control panel at your web hosting account select the addon feature option. Here you can point the additional domain names to a sub folder inside your main web hosting account. This step will register the additional domain names with the web server application. The web server will now "listen" to incoming http requests based on the host name (aka domain name). Incoming http requests for addon domain names will then be directed to the appropriate sub folders.


6
Create the different website files and upload them to the matching sub folders.


0 comments:

Thank you!

10 Tips for Choosing the Right Domain Name


Overview: Follow the steps below to avoid costly mistakes and Choosing a domain name is similar to choosing a company name it requires a lot of thought and consideration. Your domain name is your identity on the Web; you want to make sure you choose a name that not only fits your business, but is also easy to find and promote. Follow these steps to help you pick the perfect domain.

1. Make it Easy to Type

Finding a domain name that's easy to type is critical to online success. If you use slang (u instead of you) or words with multiple spellings (express vs. xpress), it may be harder for customers to find your site.

2. Keep it Short

If your domain name is long and complex, you risk customers mistyping or misspelling it. Short and simple is the way to go.

3. Use Keywords

Try using keywords that describe your business and the services you offer. For example; if you’re a glass replacement business, you may want to register GlassRepair.com or GlassReplacement.com. Include the keywords that people enter when searching for your products or services. It helps improve your rank on search engines (which increases traffic) and just makes more sense to your customers.

4. Target Your Area

If your business is local, consider including your city or state in your domain name to make it easy for local customers to find and remember. Example: PhoenixGlassRepair.com.

5. Avoid Numbers and Hyphens

Numbers and hyphens are often misunderstood — people who hear your website address don't know if you're using a numeral (5) or it's spelled out (five) or they misplace or forget the dash. If you need these in your domain, register the different variations to be safe.

6. Be Memorable

There are millions of registered domain names, so having a domain that's catchy and memorable is essential. Once you've come up with a name, share it with close friends to make sure it sounds appealing and makes sense to others

7. Research It

Make sure the name you've selected isn't trademarked, copyrighted or being used by another company. It could result in a huge legal mess that could cost you a fortune, as well as your domain!

8. Use an Appropriate Domain Name Extension

Extensions are suffixes, such as .COM or .NET, at the end of Web addresses. These can have specific uses, so make sure to choose one that works for your business. .COM is far and away the most popular, but here are some other top extensions and how they're often used:
  • .co : an abbreviation for company, commerce, and community
  • .info : informational sites
  • .net : technical, Internet infrastructure sites
  • .org : non-commercial organizations and non-profits
  • .biz : business or commercial use, like ecommerce sites
  • .me : blogs, resumes or personal sites

Tip: You don't need to build a website for every domain. Just forward any additional domains to your primary website.

9. Protect and Build Your Brand

To protect your brand, you should purchase various domain extensions, as well as misspelled versions of your domain name. This prevents competitors from registering other versions and ensures your customers are directed to your website, even if they mistype it.

10. Act Fast

Domain names sell quickly. Thankfully, they're also inexpensive, so register your favorite domain names as soon as possible. If you’re having trouble finding an available name, domain registrars like GoDaddy will suggest alternate names during your domain search to help you find the perfect name.

0 comments:

Thank you!

Tips & Precautions before buying a Domain Name

Important Precautions to Take When Buying a Domain Name

  • Completely Fresh: Not taken or registered by anyone ever! These type of domains can be registered without any worries.
  • Active but listed for Sale: A domain is currently active, but its owner wants to sell it using Domain Auctioning websites, direct advertisements, marketplaces etc. Carefully read the description of the domain, type of content hosted on it and its expiry date. You can see a live example of a marketplace here.
  • Used but Expired: Someone registered a domain, but it got expired because the owner didn’t want or forgot to renew it, and now it’s available for registration again.
  • Used and Expired, but Banned!: Someone registered a domain in the past, but it got banned by Search Engines (Google, Bing etc.) OR by some online monetizing programs (AdSense etc.) because of illicit practices (Black Hat SEO, fake clicks on advertising slots etc.) by the webmaster.
  • Active or Expired, but has a Search Engine Penalty.
If you are going to purchase a domain in near future, then let’s check out in this post some important tips and general precautions that you should consider before making the final purchase:
1. Search and Ask before buying: If you want to know whether a domain has been previously registered or not, then use following search terms in order to find traces of it on the web:
google logo
  • site:domain.com [Example] – If a domain has been discontinued a few weeks ago, then search engines may still have it in their index. But, in case the previous owner has requested to remove the domain or if it got expired many months/years ago, then search engines will not yield any results when you use the site operator (site:abcxyz.com).
  • link:domain.com [Example] – If a domain previously existed on the internet, then some sites might be linking to it. You can see a list of all those sites using link operator (link:abcxyz.com). Keep in mind, the results yielded with this operator are not so reliable. Also, sometimes the operator doesn’t yield any results, even if back links are present.
  • “domain.com” [Example] – Include the domain keywords with its TLDwithin quotation marks. This will show you a list of all those webpages that contains the term domain.com.
  • “www.domain.com” [Example] – Include www, Domain Keywords and its TLD within quotation marks. This will show you a list of all those webpages that contains the term www.domain.com.
  • “domain” [Example] – Include only domain keywords within quotation marks.
Analyze the search results carefully and you may get an idea whether someone previously owned the domain you are going to register.
If you are unable to deduce anything from search results, then I will suggest you to open a support ticket with Namecheap (my preferred registrar) and ask them directly.
2. Use Internet Archive (Way back Machine): If a domain existed on the world wide web in the past, then chances are very high that it must be present in Way Back Machine’s digital library too (Example).
way back machine
But, the database is not fully reliable as because the crawling process is slow and webmasters can easily block archive.org_bot or ia_archiver crawler from crawling their site using a robots.txt or .htaccess file. You may see No Results for certain domain names that currently exists or used to exist in the past!
3. Use AdSense Sandbox: If a domain existed in the past and you are going to register it again, then you should definitely check that it’s not banned by Google AdSense – One of the largest online monetizing program. Make use ofAdSense Sandbox and if the tool is showing NO RESULTS for a Domain, then chances are very high that it is banned by the program.
Regarding other monetizing programs (Infolinks, Kontera, Chitika etc.), you can only determine the status of a domain when you apply with them.

Additional Tips

1. Always Bargain: No matter what price has been set for a particular domain name, always bargain with the seller by contacting him directly using Email, Private Messages (feature present in most marketplaces and auctioning sites) or Telephone.
2. Research: If you are buying a domain from a re-seller, marketplace or an auctioning site, then research its credibility using Google (Example).
3. Reconsideration Request: If you have bought a domain name that was previously being used for spamming and search engines have banned it permanently, then you should file a reconsideration request.
4. Copyrights and Trademarks: You should NEVER buy a domain which contains copyrighted keywords or keywords of a trademark likeonlinefacebook.commicrosoftdeals.netgooglesearch.in etc.
In future, these type of domains are likely to be taken down from the internet OR you will be asked to hand over the domains to their respective organization/company!

0 comments:

Thank you!

How to make website with HostGator


A lot of people get overwhelmed with all the information out there on starting a website, so much so that they pay web designers to make a website for them. If you've never created a webpage before, perhaps paying a designer could be an option, but it's easier than ever to make your own website. In this article, we'll cover some of the most popular and easiest ways to make a website with Hostgator.


HostGator's Site Builder


The Weebly Website Builder that HostGator provides is free with all Shared hosting plans and very simple to use. The whole process can be done in just minutes, and there's nothing to download or upload. Once you've set up your site, you can publish your changes directly to your website.

Pros: Quick & easy. No technical knowledge required. Good to get started with.
Cons: Limited design options, not able to customize, and advanced features are sparse.

Website Templates

HostGator provides 4,450+ free website templates and designs. You can also find tons of other free templates online. Once you find a template that you like, you can download the template and edit it (fully customizable). After you edit the template using an HTML or text editor you can then upload the template through FTP to your HostGator account to publish your web page(s).

Pros: Tons of templates in many different categories with the ability to customize.
Cons: May require 'tweaking' to get the template to look the way you want.

WYSIWYG (What You See is What You Get) Site Builders

A WYSIWYG Editor is a web authoring program that can create a website for you, similar to creating a document in Microsoft Word. While the de facto standard is Adobe's Dreamweaver, you don't need to pay hundreds of dollars to get started. There are free and open source alternatives, such as Mozilla's KompoZer.
You can make a website with KompoZer through by inserting elements, such as images, tables, paragraphs, headers, et cetera without having to mess with any HTML code. Should you feel inclined, however, you can easily edit the code as well. If you don't want to start from scratch, you can get templates online (see above: Website Templates) and open them with KompoZer to tweak the look and layout.

Pros: Free and easy to get started, no HTML needed.
Cons: May take time to learn the advanced features of the software (either Dreamweaver or KompoZer).

CMS (Content Management System)


Using a CMS for your website is a great option if you intend to constantly add content, or need advanced features. The major CMS's are WordPress (also a blogging platform),Joomla, and Drupal. The most popular option on HostGator is definitely WordPress, and it can be installed with just a click through HostGator's QuickInstall feature (See video on: How easy it is to install WordPress). WordPress is very simple to use, and there are TONS of free WordPress themes and plugins out there to build almost any type of website.

Pros: Highly customizable, easy to install and get started. Easy to add new content and update pages. Keeps things organized.
Cons: Since a CMS is pre-built, it may require editing PHP/HTML/CSS code if the out-of-the-box options don't work for your website. Should be fine though in most cases.

From Scratch (HTML/CSS/PHP)

Creating a website from scratch used to be the only way to do it. Now we have tons of tools and scripts to help us. But if you're a do-it-yourself kind of person, this option might appeal to you. To get started on this path, W3Schools has some good tutorials and more information covering: HTML, CSS, and PHP.
  • HTML stands for hyper text markup language, and it's the code behind most websites. Your web browser reads this code and renders it into a document which becomes a viewable web page.
  • CSS or cascading style sheets, is a way to define the way the look and design of different elements on your website. It gives your site it's own unique style.
  • PHP or other server side scripting languages can add advanced functionality to your site like creating contact forms, and interacting with a database to store and retrieve information.

Pros: Complete control over the look and feel of your web pages.
Cons: Learning curve for beginners to get up-to-speed.

Website images / Banners / Logos

Many professionals use Adobe's Creative Suite (Illustrator and Photoshop). Photoshop is good for touching up photos, and creating banners and logos. Illustrator is a vector-based image creator that's really good for creating logos). There are free and very good alternatives to easily make images for your web site, such as GIMP (Photoshop alternative) and Inkscape (Illustrator alternative).

Summary / Conclusion

Most of Bloggers use WordPress for their websites. Once you install WordPress, you'll probably want to install a theme that you like, and add any plugins that you'll need and you're good to go. It doesn't require any advanced knowledge, it's easy to install, and as you learn you can tweak it even further. With any method you choose for making a website, it's probably a good idea to learn a little HTML and CSS by reading tutorials online, although with WordPress it's not required. If you go this route with WordPress, then it's recommended to download the following software:
  • FTP Client like FileZilla for uploading any images (free)
  • Image editors like GIMP and Inkscape (both are free)
Note: This tutorial focuses on what you need to make a website, but to get more information on hosting, domain names, and everything else you'll need, see our tutorial on Starting a Website for Beginners.

0 comments:

Thank you!